AQS 1 2 3 public abstract class AbstractQueuedSynchronizer extends AbstractOwnableSynchronizer implements java .io.Serializable ...
AQS即AbstractQueuedSynchronizer(抽象队列同步器),是其他同步器的一个抽象类
部分重要属性 AbstractQueuedSynchronizer部分属性及内部类如下:
1 2 3 4 5 6 7 8 9 10 11 12 13 14 15 16 17 18 19 20 21 22 23 24 25 26 27 28 29 30 31 32 33 34 35 36 private transient volatile Node head;private transient volatile Node tail;private volatile int state;public class ConditionObject { private transient Node firstWaiter; private transient Node lastWaiter; } static final class Node { static final Node SHARED = new Node (); static final Node EXCLUSIVE = null ; static final int CANCELLED = 1 ; static final int SIGNAL = -1 ; static final int CONDITION = -2 ; static final int PROPAGATE = -3 ; volatile int waitStatus; volatile Node prev; volatile Node next; volatile Thread thread; Node nextWaiter; }
AQS可重写的方法 AQS类定义了几个可重写的方法,待子类重写。可以看到,AQS提供了独占(排他)、非独占(共享)两种模式,只需重写其中需要使用的即可。
1 2 3 4 5 6 7 8 9 10 11 12 13 14 15 16 17 18 protected boolean tryAcquire (int arg) { throw new UnsupportedOperationException (); } protected int tryAcquireShared (int arg) { throw new UnsupportedOperationException (); } protected boolean tryRelease (int arg) { throw new UnsupportedOperationException (); } protected boolean tryReleaseShared (int arg) { throw new UnsupportedOperationException (); } protected boolean isHeldExclusively () { throw new UnsupportedOperationException (); }
AQS中几个重要的方法 排他模式占用锁acquire 从acquire入手
1 2 3 4 5 6 public final void acquire (int arg) { if (!tryAcquire(arg) && acquireQueued(addWaiter(Node.EXCLUSIVE), arg)) selfInterrupt(); }
tryAcquire(arg)交由子类重写,暂不分析
1 2 3 4 5 6 7 8 9 10 11 12 13 14 15 16 17 18 19 20 21 22 23 24 25 26 27 28 29 30 31 32 33 34 35 36 37 38 39 40 41 42 43 44 45 46 47 48 49 50 51 52 53 54 55 56 57 private Node addWaiter (Node mode) { Node node = new Node (Thread.currentThread(), mode); Node pred = tail; if (pred != null ) { node.prev = pred; if (compareAndSetTail(pred, node)) { pred.next = node; return node; } } enq(node); return node; } private Node enq (final Node node) { for (;;) { Node t = tail; if (t == null ) { if (compareAndSetHead(new Node ())) tail = head; } else { node.prev = t; if (compareAndSetTail(t, node)) { t.next = node; return t; } } } } final boolean acquireQueued (final Node node, int arg) { boolean failed = true ; try { boolean interrupted = false ; for (;;) { final Node p = node.predecessor(); if (p == head && tryAcquire(arg)) { setHead(node); p.next = null ; failed = false ; return interrupted; } if (shouldParkAfterFailedAcquire(p, node) && parkAndCheckInterrupt()) interrupted = true ; } } finally { if (failed) cancelAcquire(node); } }
接下来,分析shouldParkAfterFailedAcquire(Node pred, Node node)、parkAndCheckInterrupt()与cancelAcquire(Node node)
此外,if (p == head && tryAcquire(arg)) 保证了FIFO,避免了过早通知(节点在中断时,可能会唤醒后继节点)。
1 2 3 4 5 6 7 8 9 10 11 12 13 14 15 16 17 18 19 20 21 22 23 24 25 26 27 28 29 30 31 32 33 34 35 36 37 38 39 40 41 42 43 44 45 46 47 48 49 50 51 52 53 54 55 56 57 58 59 60 61 62 63 64 65 private static boolean shouldParkAfterFailedAcquire (Node pred, Node node) { int ws = pred.waitStatus; if (ws == Node.SIGNAL) return true ; if (ws > 0 ) { do { node.prev = pred = pred.prev; } while (pred.waitStatus > 0 ); pred.next = node; } else { compareAndSetWaitStatus(pred, ws, Node.SIGNAL); } return false ; } private final boolean parkAndCheckInterrupt () { LockSupport.park(this ); return Thread.interrupted(); } private void cancelAcquire (Node node) { if (node == null ) return ; node.thread = null ; Node pred = node.prev; while (pred.waitStatus > 0 ) node.prev = pred = pred.prev; Node predNext = pred.next; node.waitStatus = Node.CANCELLED; if (node == tail && compareAndSetTail(node, pred)) { compareAndSetNext(pred, predNext, null ); } else { int ws; if (pred != head && ((ws = pred.waitStatus) == Node.SIGNAL || (ws <= 0 && compareAndSetWaitStatus(pred, ws, Node.SIGNAL))) && pred.thread != null ) { Node next = node.next; if (next != null && next.waitStatus <= 0 ) compareAndSetNext(pred, predNext, next); } else { unparkSuccessor(node); } node.next = node; } }
大致流程如图:
排他模式释放锁release 现在,分析释放锁的过程
1 2 3 4 5 6 7 8 9 10 public final boolean release (int arg) { if (tryRelease(arg)) { Node h = head; if (h != null && h.waitStatus != 0 ) unparkSuccessor(h); return true ; } return false ; }
tryRelease(arg)由子类重写,暂不分析
1 2 3 4 5 6 7 8 9 10 11 12 13 14 15 16 private void unparkSuccessor (Node node) { int ws = node.waitStatus; if (ws < 0 ) compareAndSetWaitStatus(node, ws, 0 ); Node s = node.next; if (s == null || s.waitStatus > 0 ) { s = null ; for (Node t = tail; t != null && t != node; t = t.prev) if (t.waitStatus <= 0 ) s = t; } if (s != null ) LockSupport.unpark(s.thread); }
所以,release方法释放锁后,如果有下一个节点并且下一个节点没有被取消,则唤醒下一个节点所对应的线程
共享模式占有锁 同样从acquireShared共享模式占有锁方法开始。其中tryAcquireShared(arg)方法是模板方法,交由子类重写。
1 2 3 4 public final void acquireShared (int arg) { if (tryAcquireShared(arg) < 0 ) doAcquireShared(arg); }
进一步分析doAcquireShared(int arg)方法
1 2 3 4 5 6 7 8 9 10 11 12 13 14 15 16 17 18 19 20 21 22 23 24 25 26 27 private void doAcquireShared (int arg) { final Node node = addWaiter(Node.SHARED); boolean failed = true ; try { boolean interrupted = false ; for (;;) { final Node p = node.predecessor(); if (p == head) { int r = tryAcquireShared(arg); if (r >= 0 ) { setHeadAndPropagate(node, r); p.next = null ; if (interrupted) selfInterrupt(); failed = false ; return ; } } if (shouldParkAfterFailedAcquire(p, node) && parkAndCheckInterrupt()) interrupted = true ; } } finally { if (failed) cancelAcquire(node); } }
对比独占模式获取锁。
1 2 3 4 5 6 public final void acquire (int arg) { if (!tryAcquire(arg) && acquireQueued(addWaiter(Node.EXCLUSIVE), arg)) selfInterrupt(); }
同样是三步:
1 2 3 4 5 6 7 8 9 10 11 12 13 14 15 16 17 18 19 private void setHeadAndPropagate (Node node, int propagate) { Node h = head; setHead(node); if (propagate > 0 || h == null || h.waitStatus < 0 || (h = head) == null || h.waitStatus < 0 ) { Node s = node.next; if (s == null || s.isShared()) doReleaseShared(); } }
其中,doReleaseShared()是共享模式下释放锁
共享模式释放锁 独占模式下,释放锁没有并发风险;
1 2 3 4 5 6 7 public final boolean releaseShared (int arg) { if (tryReleaseShared(arg)) { doReleaseShared(); return true ; } return false ; }
进一步分析doReleaseShared()方法
1 2 3 4 5 6 7 8 9 10 11 12 13 14 15 16 17 18 19 20 21 22 23 private void doReleaseShared () { for (;;) { Node h = head; if (h != null && h != tail) { int ws = h.waitStatus; if (ws == Node.SIGNAL) { if (!compareAndSetWaitStatus(h, Node.SIGNAL, 0 )) continue ; unparkSuccessor(h); } else if (ws == 0 && !compareAndSetWaitStatus(h, 0 , Node.PROPAGATE)) continue ; } if (h == head) break ; } }
后继节点对应的线程被唤醒后,会尝试共享模式获取锁。如果成功,则头指针往后移动,唤醒下一个节点,重复以上步骤。最终,实现后面所有的连续的共享模式节点成功获取锁。
具体的应用有ReentrantLock、ReentrantReadWriteLock、CountDownLatch、CyclicBarrier、Semaphore等等。
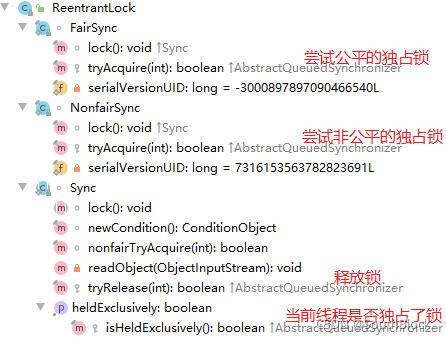
ReentrantLock ReentrantLock是可重入锁,重写了三个模板方法,实现了公平,非公平两种独占锁的方式。
可重入的底层 ①state字段表示当前线程锁占有的层数(可重入锁可重入的关键)
公平、非公平底层 直接查看关键代码
1 2 3 4 5 6 7 8 9 10 11 12 13 14 15 16 17 18 19 20 21 22 23 24 25 26 27 28 29 30 31 32 33 34 35 36 37 38 39 40 41 42 43 protected final boolean tryAcquire (int acquires) { final Thread current = Thread.currentThread(); int c = getState(); if (c == 0 ) { if (!hasQueuedPredecessors() && compareAndSetState(0 , acquires)) { setExclusiveOwnerThread(current); return true ; } } else if (current == getExclusiveOwnerThread()) { int nextc = c + acquires; if (nextc < 0 ) throw new Error ("Maximum lock count exceeded" ); setState(nextc); return true ; } return false ; } final boolean nonfairTryAcquire (int acquires) { final Thread current = Thread.currentThread(); int c = getState(); if (c == 0 ) { if (compareAndSetState(0 , acquires)) { setExclusiveOwnerThread(current); return true ; } } else if (current == getExclusiveOwnerThread()) { int nextc = c + acquires; if (nextc < 0 ) throw new Error ("Maximum lock count exceeded" ); setState(nextc); return true ; } return false ; }
对于其他的应用暂不做考虑了。
由于笔者能力有限,本文中难免会有一些错误或者不准确的地方,恳请读者批评指正。
看到这里,相信你对AQS已经有了较深的理解。如果本文对你有所帮助,不妨点赞支持一下!谢谢你的阅读与支持!
推荐阅读 《The java.util.concurrent Synchronizer Framework》 JUC同步器框架(AQS框架)原文翻译